An Historic Adobe
by Dr. Victor A. Walsh, Historian II
José Manuel Machado, a retired soldier from the presidio, built the Casa de Machado y Stewart around 1835. Made of sun-dried adobe bricks, the home originally had two rooms: a bedroom and living room. Like most adobes of the time, it was framed with ridgepoles, which were fastened around overhead rafters and beams with strips of rawhide. The roof, most likely, was originally covered with tule thatch called carrizo, and then packed with dried mud.
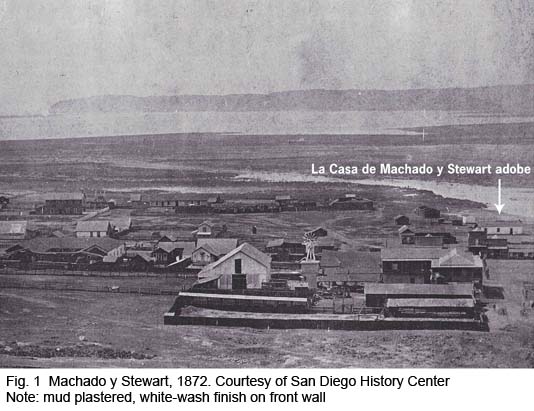
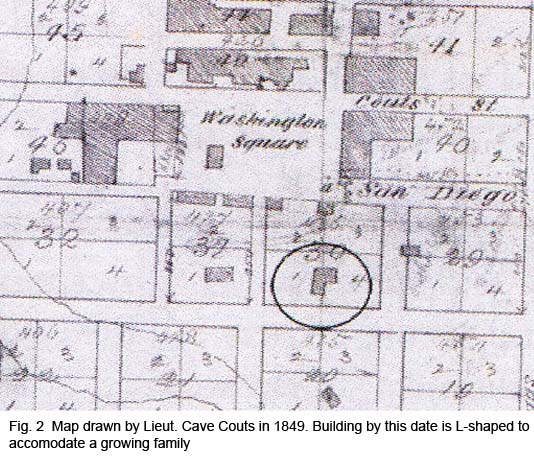
The youngest daughter Rosa and her husband Jack Stewart, a sailor and carpenter from Maine, moved into the home after their marriage in 1845. It was their only home. During their long residence, they made continual improvements, including adding rooms, lime washing the adobe walls, and building a barrel clay tile roof, wood-paned windows, and rear piazza or columned porch for outdoor gatherings, The 1849 map drawn by Cave Couts shows an elongated building with a wing wall on the west side extending south towards present-day Congress Street.
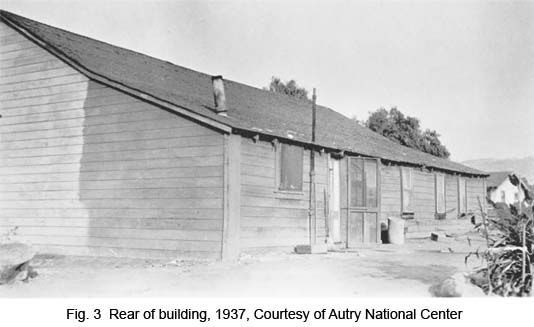
Although listed as a California Historic Landmark in 1932, the building's historic integrity and appearance have been significantly compromised by previous large-scale alterations. In 1911, Frank "Pancho" Stewart, Machado's grandson, completely remodeled the home, building a new wooden porch, shingling the roof, covering the exterior adobe walls with wood siding, adding new windows, and laying interior tongue-and-groove floors and wood board ceilings. A fireplace was built at the building's west end along with an outdoor oven.
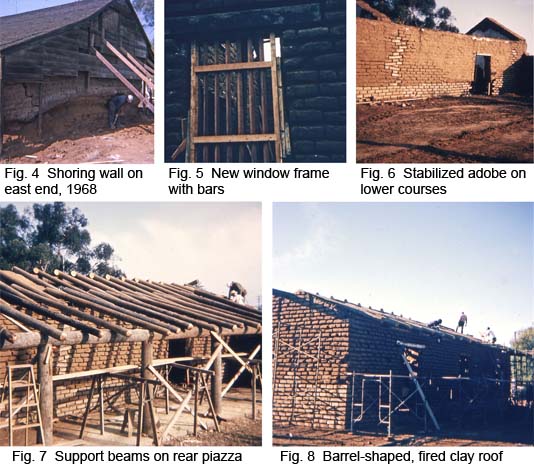
In 1967, the Department of Parks and Recreation acquired the adobe, by then in a severely dilapidated condition, and the following year hired Coneen Construction to repair and restore it to its original appearance (circa 1835-1845). The rehabilitation (it was not a restoration) included shoring the walls to place new concrete footings and replacing damaged adobe brick on the lower courses with stabilized brick formed from adobe and cement. The rear exterior wood-framed wall was removed and the historic adobe piazza reconstructed. A new barrel clay-tile roof and period-appropriate doors, casement-sash windows, and shutters were installed along with hand-wrought hardware and wood latches. None of the removed doors, window frames, and hardware, according to architect Clyde Trudell’s report (September 1967) were original.
A small grant of $5,000 from California State Parks' Cultural Resource Management Plan provided money to repair the east-facing adobe wall. The contractor was J. H. Benton Construction of San Diego. Three individuals—Charlie Merino, the foreman, Chris Fuerstnau, a park aide, and myself—worked on the month-long project beginning in late May 2011. What follows is a description of the scope of work: what was done and how it was done.
Wall Inspection and Excavation
The first thing we did was to excavate and remove topsoil in order to locate the concrete footing underneath the wall. With the exception of the northeast corner, the footing is generally flush with the wall. Sections extending beyond the wall were trimmed off with a circular saw to prevent moisture buildup or water from ponding along the base.
Photographs from the 1968 rehabilitation indicate that the adobe bricks on the lower courses had been badly eroded over the years due to flooding. They also show that construction crews rebuilt damaged lower portions of the exterior side and front walls with stabilized adobe brick. The rear adobe wall was completely reconstructed. Plaster contained sand, adobe mud, and some Portland cement mixed with a small amount of asphalt emulsion.
Cement is not only non-historic but also incompatible with nineteenth-century building materials such as adobe and lime plaster because it is less porous. When exposed to temperature changes, it expands or contracts differently, causing adobe brick or mud and lime plasters to crack or buckle. It can be used on historic adobes for foundations (traditional cobble is my preference) provided there is no trim or skirt at the base or if it is 5% or less of the mix. The proportion of cement in the 1968 adobe brick at the Machado y Stewart is much higher. The brick is too hard, which prevents the wall from 'breathing' or absorbing (and evaporating) adequate moisture. Mud and lime-based plasters do not bond on hard, dry walls. In other words, cement can complicate rehabilitation treatments that utilize historic building materials.
Prepping the Wall
After removing loose and broken adobe brick, including a large swath in the lower southeast corner, we faced the unenviable task of devising a strategy to rehydrate the wall. This does not mean spraying a mist on the wall, but thoroughly wetting it with a high-pressure nozzle and then scrubbing the brick with wet bristle brushes and burlap. Do not use wire brushes. This process was repeated twice daily for over a week until the wall stopped drying out. We also used pneumatic drills to aerate the drier sections of the wall with water.
After this, we applied a thin coat of lime wash to rewet the brick. The calcium molecules in the lime reduce evaporation and enhance the bonding capability of the mud or lime plaster. As the lime water in the wall and mud dry and re-carbonate together, a chemical bond is formed between the two. Do not use Type S ‘bagged line.’ While much less expensive and more readily available than hydraulic lime, it is not properly slaked and fired. Type S lime begins to pop and blister prematurely, within a few months after application, especially on walls directly exposed to sunlight.

Drainage and Grading
Proper site drainage and grading is essential to maintaining adobes. This includes removing shrubs and other barriers that trap water, surplus topsoil, grading the terrain to slope away from the building, and possibly installing subsurface or surface drainage. We dug out three-to-four inches of topsoil around the existing ABS surface line, uncapped and tested it with running water. It worked fine. Charlie and Chris then installed grated drains at the wall corners, filled in the shallow trench with DG, and mortared cobblestone around them. 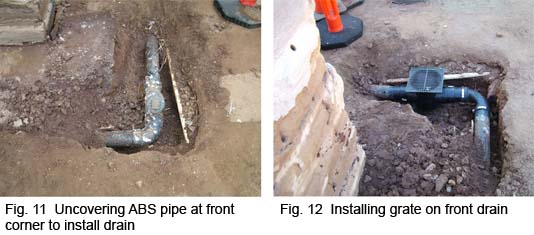
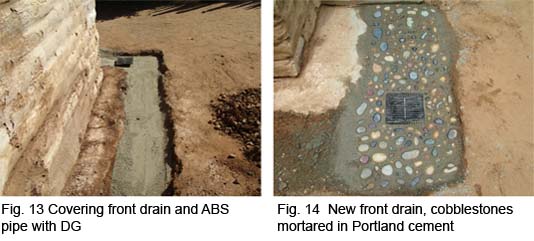
Bob Moore, the district heavy equipment operator, removed the topsoil to several inches above the concrete footing and carefully sloped the grade away from the building so that the bulk of the rainwater will now flow into the lower drain instead of settling along the footing.
Re-Bricking and Plastering the Wall
We rewetted the wall, chiseled out the sections to be re-blocked, and then fastened a diamond-mesh metal lath to them. Some preservationists recommend using wood lath to improve bonding since it does not rust. Wood lath, however, eventually rots, and metal lath, which is far more malleable, adheres much better to uneven adobe surfaces. Rust should not be the deciding issue. Fiberglass is the best type of lath to use because it is not only more malleable than metal lath, but it also traps the plaster in the mesh and does not rust.
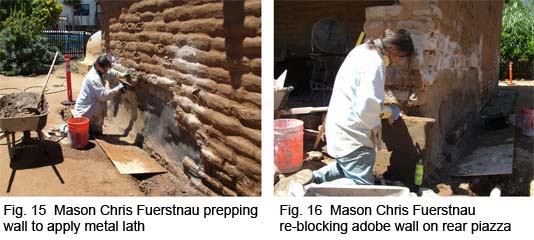
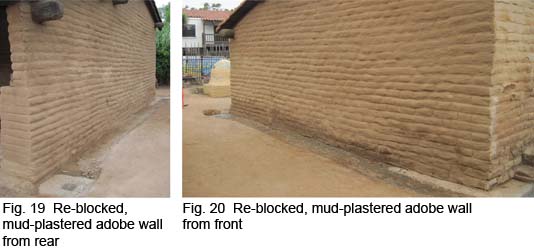
Charlie cut the adobe brick to size, approximately 15” long x 4” high x 4.5 to 6” deep. The bricks are traditional adobe without cement. Some Portland cement, at a ratio of about one to eight, was added to the mud plaster and mortar to enhance compatibility with the existing stabilized adobe brick. The badly damaged lower southeast corner was re-blocked and re-mortared seven courses from its highpoint to the base (approximately 40”). The bricks were laid with joints offset in alternating patterns.
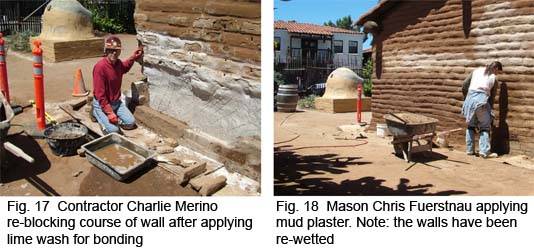
After blocking and repairing the wall, we brushed the mud plaster slurry to match the existing texture and color of the other walls. With limited funding, we decided it was better to match the existing non-historic finish on the other walls than to refinish the wall correctly with a smooth whitewash finish, which would obviously stand out from the other walls.
Repairing Viewing Platforms on the Front Wall
The stabilized adobe pavers on the two raised viewing platforms below the front wall windows and adjacent railings are non-historic features. They were built to allow visitors to view the two rooms, which are closed to the public.
The pavers were badly worn and cupped due to heavy foot traffic over the years. The mortar used to hold them was cement, which only aggravated the situation. Being more resistant to foot traffic, it eventually formed ridges--an obvious tripping hazard. Mortar should always be compatible with or slightly softer than the material it bonds.
The mortar selected was type N: 1 part Portland cement, 1 part hydrated lime, and 5-6 parts sand. We removed the paver tiles, which were beyond repair, and cement mortar on the steps and replaced with new pavers matching in-kind the old ones. Another course of paver tiles was added to both platforms to provide small children with a better view of the rooms. 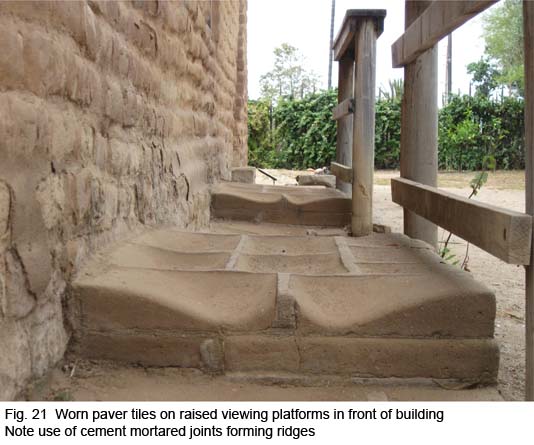
New tiles were marked off with stringers, set in quick-drying cement, and leveled. Once they set firmly, type N mortar mix was applied in layers to fill the 2” deep joints. Each layer was tamped down until it was thumb hard. The last layer was mixed with mud to camouflage the mortar. 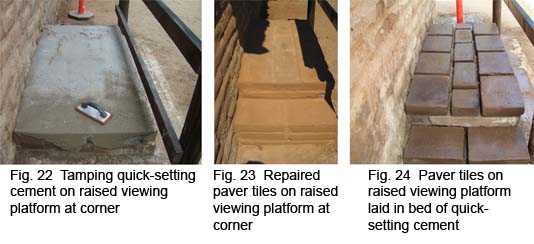
The wood railings were cleaned with soap and water mixed with some bleach and painted with three coats of boiled linseed oil mixed with thinner.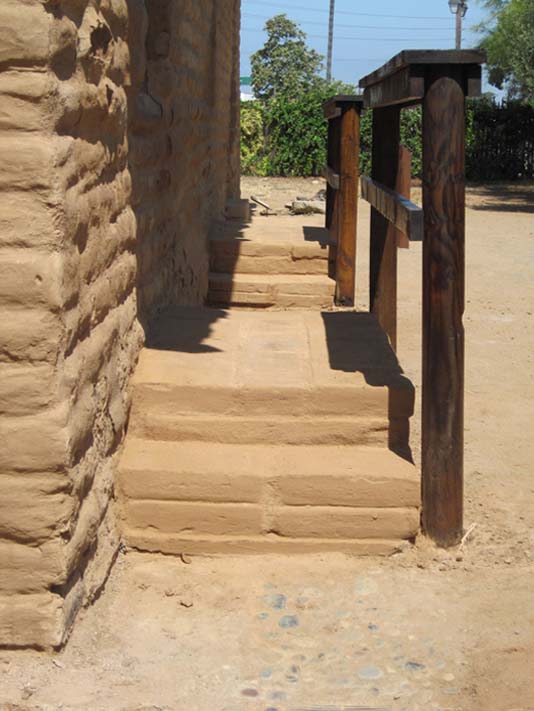
Preservation Means Maintenance
The San Diego Coast District relies largely on deferred maintenance money to maintain its historic buildings. Adobes require regular and continuous maintenance. They cannot be maintained on a deferred basis every tenth or twelfth year. They must be inspected on a regular basis, especially after rainstorms, photo-documented, and repaired before the problem festers and becomes a major capital outlay. This is a complex issue, subject to the uncertainty and vicissitudes of public funding authorized by the legislature. Nonetheless, it needs to be addressed.
Secondly, contractors who work on historic buildings must be knowledgeable about preservation standards, working with historic tools and building materials, and developing methods to scope the work properly. Too often, the District and concessionaires have hired contractors who are not well qualified in these areas due, in part, to the fact that public works law requires state agencies to award contracts to the low-dollar bidder.
